Introducing the Kluctl Webui
This blog post serves as an introduction and a tutorial for the new Kluctl Webui, which marks the next milestone in the Kluctl Ecosystem. It gives you visibility and control over your Kluctl deployments, no matter if these happen through your local command line, a CI/CD pipeline or the Kluctl GitOps Controller.
The Webui has been released as part of the v2.21.0 release of Kluctl.
What is Kluctl?
In case this is the first time you heard about Kluctl, lets take a few steps back and first give a short introduction what Kluctl actually is. Kluctl is a tool that allows you to declaratively describe and define your Kubernetes deployments. Kluctl deployments are built from deployment items (e.g. Helm Charts or Kustomize).
Variable Sources of all kinds (e.g. file, Git, Vault, K8s Secrets, …) together with templating allow you to glue together everything and implement proper configuration and multi-environment + multi-cluster support.
At the same time, it provides you with a unified interface to these deployments, based on targets.
Targets are deployed via the command line or via GitOps.
Why a Webui?
Kluctl already works great when used via the CLI tool or as a GitOps solution. It can however become hard to monitor and manage your deployment if only CLI tools are available. Getting an overview of the state (drift, history, warnings, errors, …) of all deployments is much more effective when done on a visual basis.
Preparations
Let’s begin with installing Kluctl, creating a local cluster and creating/forking a simple Kluctl project.
Installing Kluctl
You will of course need the Kluctl CLI to be installed. You can follow the instructions found here (only install the CLI for now).
Create the cluster
Now, let’s create a local cluster. We’re going to use Kind for this:
$ kind create cluster
Creating cluster "kind" ...
 ✓ Ensuring node image (kindest/node:v1.27.3) 🖼
 ✓ Preparing nodes 📦
 ✓ Writing configuration 📜
 ✓ Starting control-plane 🕹️
 ✓ Installing CNI 🔌
 ✓ Installing StorageClass 💾
Set kubectl context to "kind-kind"
You can now use your cluster with:

kubectl cluster-info --context kind-kind

Thanks for using kind! 😊
Fork the kluctl-examples repo
To be able to fully follow this tutorial, it’s advised to fork the kluctl-examples repository into your personal GitHub account.

Make sure that the forked repository is publicly accessible (which is the default) so that the Kluctl Controller can later pull from it.
From now on, whenever this tutorial refers to the kluctl-examples repository, use your forked repository.
Also, watch out for <username> in repository URLs and replace them accordingly with your own username.
Clone the forked repository
Clone the forked repository (watch out for <username> in the URL, as mentioned above):
$ git clone git@github.com:<username>/kluctl-examples.git
$ cd kluctl-examples/simple
All commands shown from now on are meant to be run in the simple sub-directory.
Starting the Webui
The Webui can be run in different ways. The easiest way is to simply run it locally:
$ kluctl webui run
kluctl webui run
ⓘ Webui is available at: http://localhost:8080
ⓘ Opening browser
...
This will open the Webui in your browser. In case it shows an error message in regard to the port being used already, use
the --port argument to use another port.
The Webui will at first be empty and show no targets and no deployment results.
Play with the Kluctl CLI
Initial deployment
The Webui will show all past deployments that happened, including deployments performed by the CLI and GitOps. Let’s see this in action:
$ kluctl deploy -t simple
...
New objects:
  Namespace/simple
  simple/Service/nginx
  simple/Deployment/nginx-deployment
...
The above command will first perform a dry-run and ask for confirmation after showing the diff. Press y to confirm the
deployment. After that, it will show the another diff, which should match the diff from before. This way, you can verify
that it actually did what it announced before.
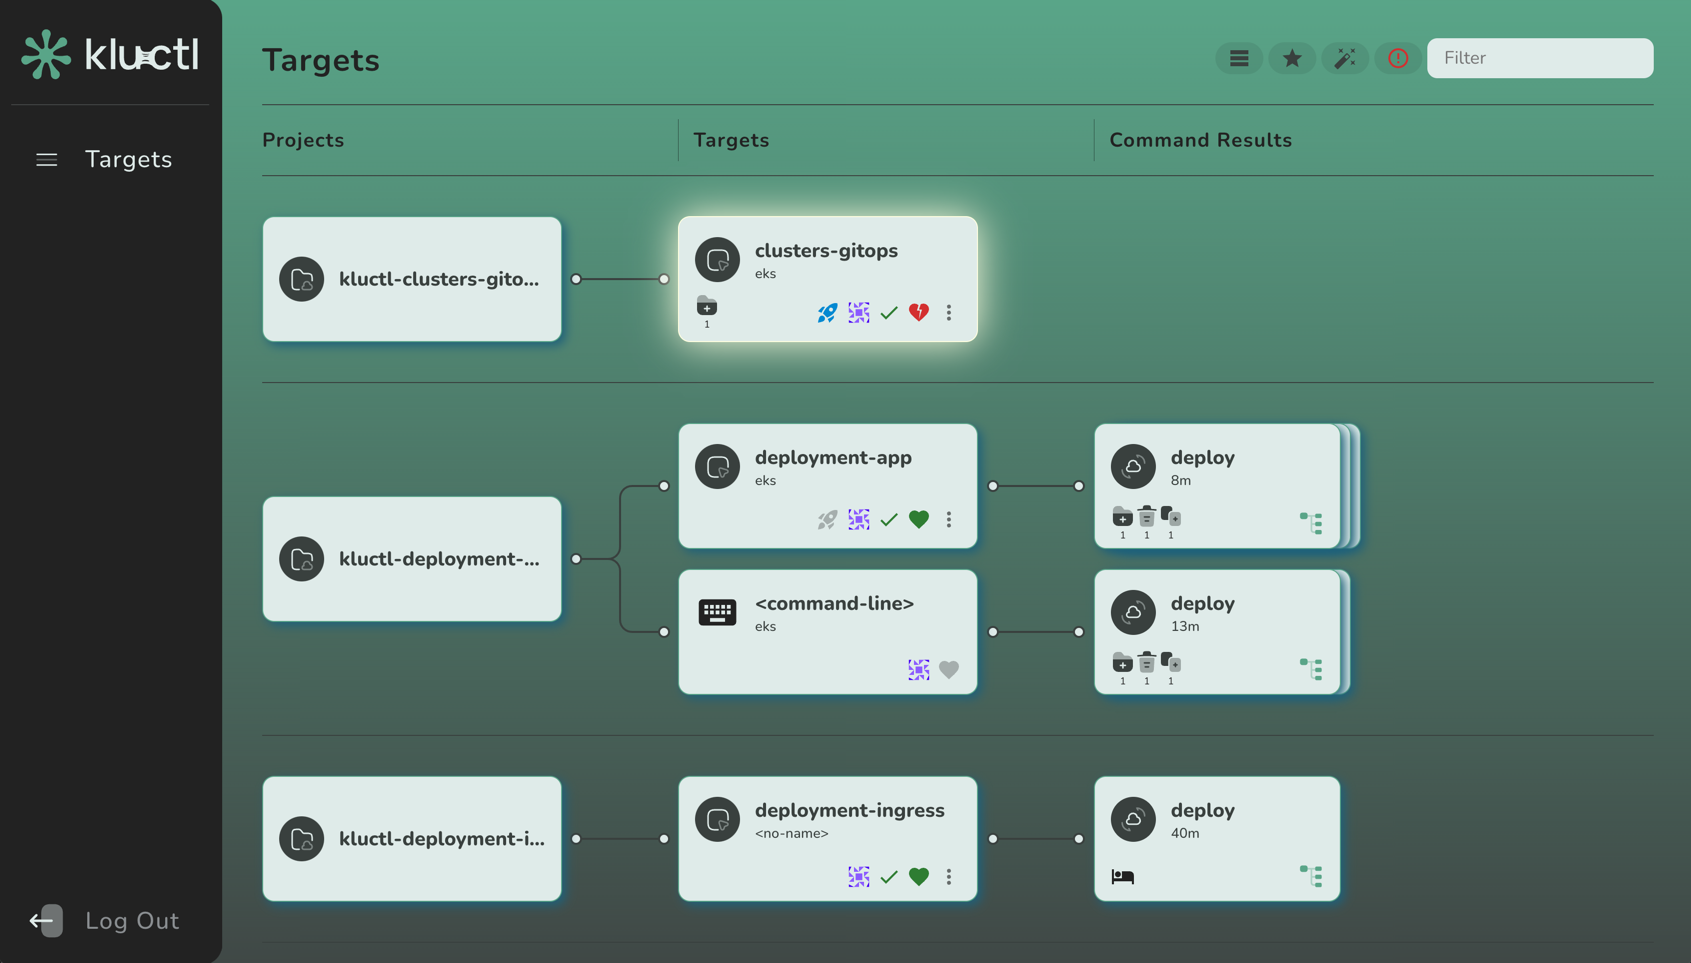
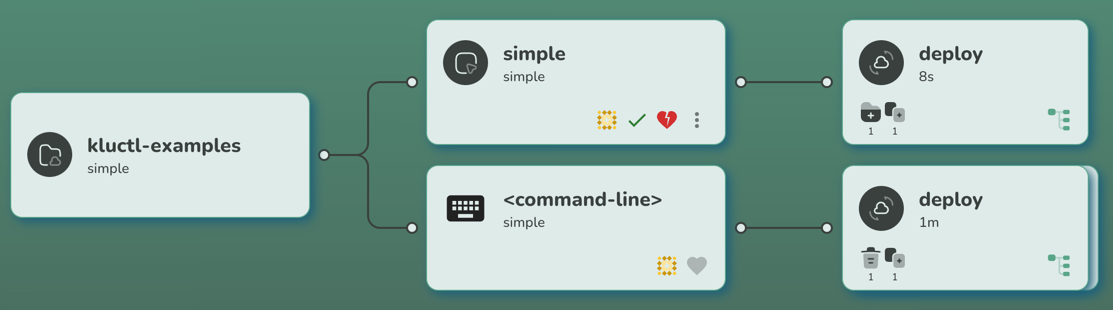
After the above command is finished, the Webui will update immediately and show you three cards:
The first one represents the Git project. If you point your mouse curser on it, it will give you a few more details (e.g. URL and sub-directory).
The second card represents the target. It is defined in the
.kluctl.yaml
of the project and named simple. You can click on this card to get some information about the target (this will get more
interesting with GitOps).
The third card represents the result of the kluctl deploy invocation. You can click on it to get more information.
In this case, you can for example see that the deployment resulted in many new objects being created. If you click on the
tree icon on the bottom right of the card, you can examine the rendered deployment manifests and finally applied resources.
Perform some changes
Now let’s change something and re-deploy it. Use your favourite IDE/editor to perform whatever modification you like.
As an alternative, simply run the following commands to do some yq (which must be installed) magic:
$ yq -i '.spec.replicas=1' deployment/nginx/deploy.yml
$ yq -i '.spec.template.spec.containers[0].ports[0].containerPort=8080' deployment/nginx/deploy.yml
$ yq -i 'del(.resources[2])' deployment/nginx/kustomization.yml
Now let’s deploy this (don’t forget to confirm with y) and see what happens:
$ kluctl deploy -t simple --prune
...
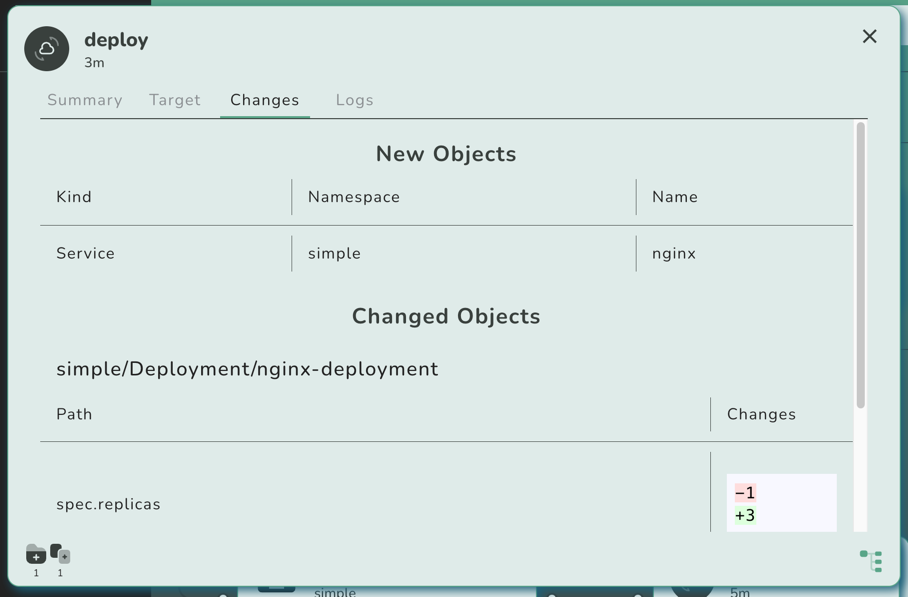
Changed objects:
simple/Deployment/nginx-deployment
Diff for object simple/Deployment/nginx-deployment
+---------------------------------------------------------+-------+
| Path | Diff |
+---------------------------------------------------------+-------+
| spec.replicas | -3 |
| | +1 |
+---------------------------------------------------------+-------+
| spec.template.spec.containers[0].ports[0].containerPort | -80 |
| | +8080 |
+---------------------------------------------------------+-------+
Deleted objects:
simple/Service/nginx
...
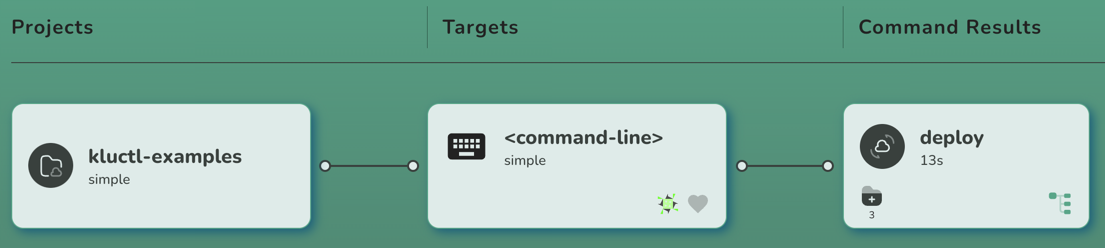
After the deployment is finished, the Webui should update again:
If you click on the new result card, you should see the same changes being shown as already printed to the console:
Introduce GitOps
Now let’s introduce GitOps, so that our deployment is automatically deployed whenever changes get pushed to the (forked) Git repository.
Install the Kluctl Controller
Let’s first install the Kluctl Controller by
invoking the kluctl controller install command:
$ kluctl controller install
...
New objects:
  Namespace/kluctl-system
  kluctl-system/ServiceAccount/kluctl-controller
  CustomResourceDefinition/kluctldeployments.gitops.kluctl.io
  kluctl-system/Deployment/kluctl-controller
...
You now have the controller running in the cluster, waiting for KluctlDeployment custom resources to be deployed.
At this point, you might need to restart the Kluctl Webui due to a minor bug, which prevents it to know about the
freshly installed KluctlDeployment CRD. Please restart the Webui by pressing CTRL+C in the terminal that runs it
and then start it again. This issue will be fixed in a later version of the Webui.
Create the first GitOps deployment
Create the file kluctl-gitops.yaml with the following content (replace <username> with your username):
# file: kluctl-gitops.yaml
apiVersion: gitops.kluctl.io/v1beta1
kind: KluctlDeployment
metadata:
  name: simple
  namespace: kluctl-system
spec:
  interval: 1m
  timeout: 1m
  source:
    url: https://github.com/<username>/kluctl-examples
    path: simple
  target: simple
  context: default
  prune: true
Now apply it via kubectl apply. Please note, that in the real-world, you would use a dedicated Kluctl project to deploy and manage
the KluctlDeployment resources.
$ kubectl apply -f kluctl-gitops.yaml
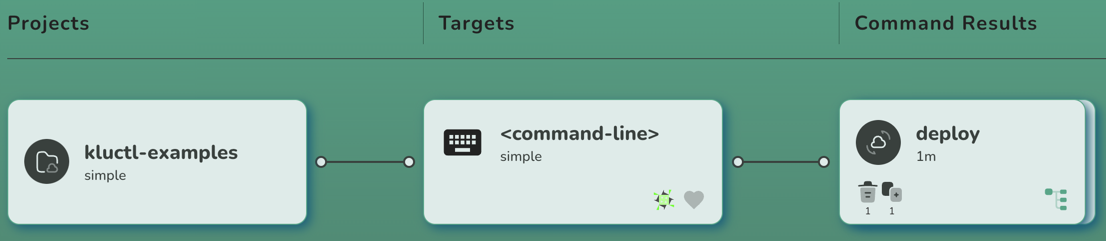
Now wait for a few seconds until the first reconciliation has finished. You will then see the Webui updating itself again,
this time by adding another target card that represents the new KluctlDeployment.
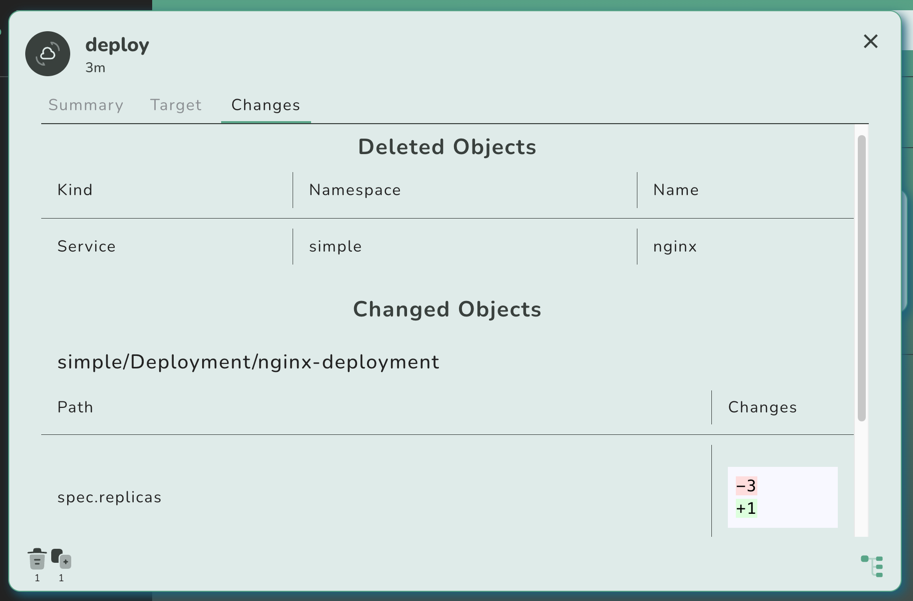
If you click on the new result card (the one right to the simple target card), you will notice that the controller
has reverted all changes we did through the most recent kluctl deploy invocation:
This is because the controller has now deployed the most recent state found in the Git repository, not knowing anything about our local changes.
You might also notice that the target card shows a red and broken heart, indicating that the deployment is unhealthy.
This is because right after the deployment has been performed, the nginx replicas are not fully up-to-date yet,
causing the validation to fail initially. The target will become green after a minute or so, whenever the next
reconciliation/validation finishes.
Commit and push!
Now let’s commit and push our changes:
$ git add deployment/nginx/deploy.yml deployment/nginx/kustomization.yml
$ git commit -m "some changes"
$ git push origin
Now wait a few seconds (up to a minute, due to the interval in the KluctlDeployment) until the changes get re-deployed.
You can speed this up by performing a manual reconciliation attempt:
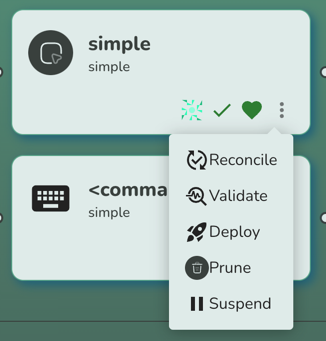
As you can see, you can also request a manual deployment, pruning and validation via the actions menu. Suspension is
also possible, which internally sets the spec.suspend field to true.
Cause some drift
By default, the Kluctl Controller only performs a deployment when a reconciliation attempt detects a change in the rendered manifests. Practically, this means that deployments only happen when you change something in the Git repository.
This also means, that the deployed objects can drift away on the cluster, for example because someone changed the objects manually or because some unrelated operator/controller decided to touch your resources.
Let’s simulate this with a kubectl patch:
$ kubectl -n simple patch deployments nginx-deployment --patch '{"spec": {"replicas": 3}}'
The next reconciliation attempt will reveal the now introduced drift:

If you click on the target card, you’ll see how exactly the deployment drifted (you’ll see the spec.replicas changed).
By default, the controller will not fix the drift until some source code changes. You can change this behaviour by
setting spec.deployInterval in the KluctlDeployment.
To fix the drift without a source change, simply request a manual deployment through the actions menu.
Manual Deployments
In some situations, it is not desired to have fully automated deployments every time the source code changes. There could be different reasons for this, for example because timing of the deployment is important (e.g., not in business hours!).
In that case, you can set a KluctlDeployment to be manual. Do this by setting the
spec.manual field of the KluctlDeployment to true.
Let’s introduce another KluctlDeployment that deploys a different target
that is configured to be manual. Luckily, the .kluctl.yaml
of the project already defines another target.
Let’s create a new KluctlDeployment manifest (kluctl-gitops-another.yaml) that uses this target.
# file: kluctl-gitops-another.yaml
apiVersion: gitops.kluctl.io/v1beta1
kind: KluctlDeployment
metadata:
  name: another
  namespace: kluctl-system
spec:
  interval: 1m
  timeout: 1m
  source:
    url: https://github.com/<username>/kluctl-examples
    path: simple
  target: another
  context: default
  prune: true
  manual: true
Apply it with kubectl apply:
$ kubectl apply -f kluctl-gitops-another.yaml
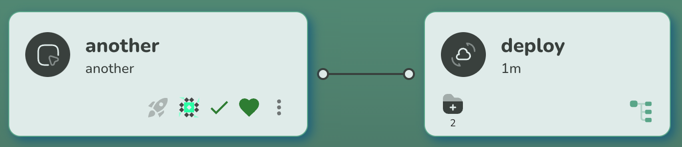
Shortly after this, you should see the following target appear:
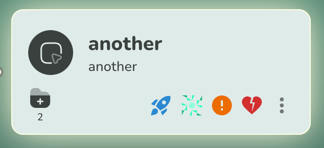
The target is currently unhealthy and drifted. This is because the controller won’t even do the initial deployment automatically. Only after you click the blue rocket button, the controller will perform the deployment. After clicking the rocket, you’ll see the first command result card appear.
Now let’s change something (upgrade nginx) and push it:
$ yq -i '.spec.template.spec.containers[0].image="nginx:1.25.2"' deployment/nginx/deploy.yml
$ git add deployment/nginx/deploy.yml
$ git commit -m "upgrade nginx"
$ git push origin
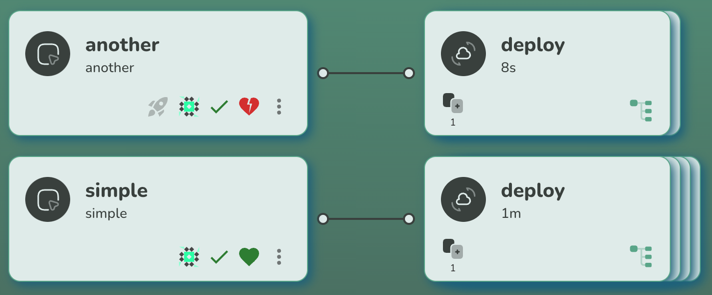
Now, if you wait long enough, you’ll see two things. First, the older simple target will auto-deploy and thus solve
the drift automatically. The new another target will however not auto-deploy but instead just show the drift between
the Git repository and the actual cluster state.
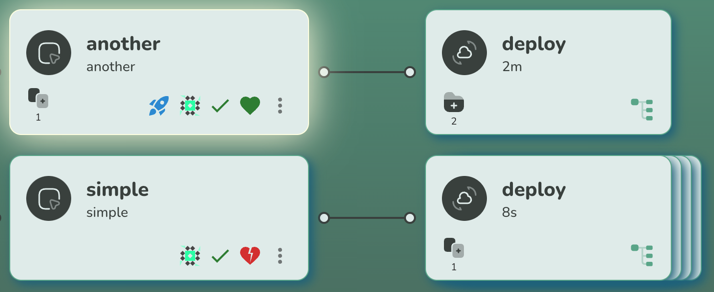
You can now click on the blue rocket again, after which it will deploy the current state.
Summing it up
The Kluctl Webui is a major milestone in the Kluctl ecosystem. It makes Kluctl a valid competitor in the GitOps space, especially when a UI is a big decision factor. It is also easy to start using it, as there is no need for a complex installation or maintenance.
What’s next?
The Kluctl Webui is still in an early stage. A lot of features will be added to it, including live visualisation of the cluster state, pod logs, simple control of application related resources (pod restart, deletion of resources, …).
Also, multi-cluster support will be properly implemented in the future. The Webui is already able to serve multiple
clusters (use multiple --context arguments in kluctl webui run), but without proper grouping/filtering abilities.
This will be improved in upcoming versions.
The Webui has basic OIDC support but misses RBAC style authorization. Future versions of the Webui will allow to properly authorize individuals/groups for specific deployments and actions.
I’m looking forward to the first users trying it out and giving feedback. I’m also happy to see people interested in contributions, especially in the space of HTML/CSS/React/…, as these are areas which I do not count as my main strength :)