Managing many Helm Charts with Kluctl
If you are a DevOps engineer, SRA, a Homelab enthusiast or in any other comparable role that needs to manage Kubernetes deployments, you’ll probably have made the same journey that many others have gone. You started with plain YAML manifests deployed via kubectl and eventually found out about Helm and Kustomize.
Whatever tool you decide to go for, the next realisation is usually that Helm and Kustomize itself need to be managed as
well. The naive solution is to create shell scripts that perform the required helm install and helm upgrade commands,
but these easily turn out to be unmanageable and quite limited.
There are multiple solutions available that allow you to manage your (and all third-party) Helm Charts and Kustomize deployments. Examples are Flux, Argo CD, Helmfile and Kluctl. This blog post will concentrate on Kluctl and at the end shortly compare it with the other options.
The final project that results from this post can be found in the kluctl-examples repository.
What to learn from this post?
I hope this post allows its readers to learn how easy it can be to manage multiple Helm Charts from one deployment project while leveraging the following features and advantages of Kluctl:
- Keep full control over deployment order (e.g. cert-manager after Cilium and apps after all base deployments)
- Organise your deployment project in a way that feels natural (a straightforward folder structure)
- Use the Kluctl CLI to diff and deploy and always be confident about the consequences of your deployment
What to deploy?
We will deploy two categories of deployments. The first category is a collection of “base” deployments, namely the following Helm Charts:
The second category contains “apps”, or the podinfo microservice to be specific. It should be easy to apply the same ideas you learn in this post in case you want to add more apps to the deployment.
The reason for this split is that it allows us to leverage Kluctl’s abilities to do dependency management and ordered deployments. It will also allow us to split up the project into multiple projects later (in a future blog post).
You might have noticed that we also deploy Cilium, which is usually unnecessary when deploying to a local cluster. I decided to still do this in this tutorial, as I believe that we can learn a lot from this, especially in regard to deployment order and dependency management (e.g., without a CNI, nothing else will work).
Setting up a local cluster
We’ll use kind for the local cluster. As we need to disable a few things (CNI and kube-proxy),
and also expose some ports (for ingress-nginx), let’s first create a proper kind configuration under ./kind-config.yaml:
# three node (two workers) cluster config
kind: Cluster
apiVersion: kind.x-k8s.io/v1alpha4
nodes:
  - role: control-plane
    # this is required for ingress-nginx to work
    kubeadmConfigPatches:
      - |
        kind: InitConfiguration
        nodeRegistration:
          kubeletExtraArgs:
            node-labels: "ingress-ready=true"
    extraPortMappings:
      - containerPort: 80
        hostPort: 8080
        listenAddress: 127.0.0.1
        protocol: TCP
      - containerPort: 443
        hostPort: 4443
        listenAddress: 127.0.0.1
        protocol: TCP
  - role: worker
  - role: worker
networking:
  # we use Cilium, so let's disable the default CNI
  disableDefaultCNI: true
  kubeProxyMode: none
Now let’s create the kind cluster:
$ kind create cluster --name kluctl-tutorial --config kind-config.yaml
Creating cluster "kluctl-tutorial" ...
 ✓ Ensuring node image (kindest/node:v1.25.3) 🖼
 ✓ Preparing nodes 📦 📦 📦
 ✓ Writing configuration 📜
 ✓ Starting control-plane 🕹️
 ✓ Installing StorageClass 💾
 ✓ Joining worker nodes 🚜
Set kubectl context to "kind-kluctl-tutorial"
You can now use your cluster with:

kubectl cluster-info --context kind-kluctl-tutorial

Thanks for using kind! 😊
If you check the PODs of the cluster now, you’ll see:
$ kubectl get pod -A
kube-system          coredns-565d847f94-hcf4m                                0/1     Pending   0          4m37s
kube-system          coredns-565d847f94-md625                                0/1     Pending   0          4m37s
kube-system          etcd-kluctl-tutorial-control-plane                      1/1     Running   0          4m51s
kube-system          kube-apiserver-kluctl-tutorial-control-plane            1/1     Running   0          4m50s
kube-system          kube-controller-manager-kluctl-tutorial-control-plane   1/1     Running   0          4m51s
kube-system          kube-scheduler-kluctl-tutorial-control-plane            1/1     Running   0          4m51s
local-path-storage   local-path-provisioner-684f458cdd-zl8xj                 0/1     Pending   0          4m37s
Please note that multiple PODs are in pending state, which is because there is no CNI deployed. We’ll fix this as the first step now.
Setting up the basic project structure
Let’s first create some basic project structure. A Kluctl deployment project starts with a root deployment.yaml which usually just includes more deployment projects and items.
A deployment item is a collection of Kubernetes manifests, either directly provided or generated from Kustomize or Helm.
Our root deployment yaml (./deployment.yaml) should look like this:
deployments:
  - include: base
This tells Kluctl that a sub-deployment should be included from the path ./base.
Now create ./base/deployment.yaml:
deployments:
  - path: cilium
This tells Kluctl that a deployment item at the location ./base/cilium should be deployed. The referenced folder
can contain plain manifests, a Kustomize deploymnet
or a reference to a Helm Chart and the necessary Helm Values.
In this case, it will be a Helm Chart.
Adding the first Helm Chart (Cilium)
A Helm based deployment item can be specified by putting a helm-chart.yaml file into the item’s directory. This means,
we have to add ./base/cilium/helm-chart.yaml with the following content:
helmChart:
  repo: https://helm.cilium.io/
  chartName: cilium
  chartVersion: 1.13.0
  skipPrePull: true
  releaseName: cilium
  namespace: "kube-system"
If you’re used to Helm already, you’ll probably recognise most of the parameters for the helmChart already. You
basically provide the repository URL, the chart name and version and some information about the release to be deployed.
The configuration/values for the Helm Release are passed via the helm-values.yaml file, which must be put along the
helm-chart.yaml, so it must be at ./base/cilium/helm-values.yaml. For our Cilium inside Kind example, these are good
values:
nodeinit:
  enabled: true
kubeProxyReplacement: strict
hostServices:
  enabled: false
externalIPs:
  enabled: true
nodePort:
  enabled: true
hostPort:
  enabled: true
bpf:
  masquerade: false
image:
  pullPolicy: IfNotPresent
ipam:
  mode: kubernetes

# See https://medium.com/@charled.breteche/kind-cluster-with-cilium-and-no-kube-proxy-c6f4d84b5a9d for details
k8sServiceHost: kluctl-tutorial-control-plane
k8sServicePort: 6443
The above values are loosely based on the Kind cluster with Cilium and no kube-proxy.
Let’s deploy it!
That’s all we need for a working and minimalistic Kluctl deployment. Let’s actually deploy it now (press y when asked!):
$ kluctl deploy
✓ Loading kluctl project
✓ Initializing k8s client
✓ Rendering templates
✓ Pulling Helm Chart cilium with version 1.13.0
✓ Rendering Helm Charts
✓ Building kustomize objects
✓ Postprocessing objects
⚠ No discriminator configured. Orphan object detection will not work
⚠ No discriminator configured for target, retrieval of remote objects will be slow.
✓ Getting 16 additional remote objects
✓ Getting namespaces
✓ cilium: Applied 16 objects.
✓ Running server-side apply for all objects

Warnings:
  no discriminator configured. Orphan object detection will not work

New objects:
  ClusterRole/cilium
  ClusterRole/cilium-operator
  ClusterRoleBinding/cilium
  ClusterRoleBinding/cilium-operator
  kube-system/ConfigMap/cilium-config
  kube-system/DaemonSet/cilium
  kube-system/DaemonSet/cilium-node-init
  kube-system/Deployment/cilium-operator
  kube-system/Role/cilium-config-agent
  kube-system/RoleBinding/cilium-config-agent
  kube-system/Secret/cilium-ca
  kube-system/Secret/hubble-ca-secret
  kube-system/Secret/hubble-server-certs
  kube-system/Service/hubble-peer
  kube-system/ServiceAccount/cilium
  kube-system/ServiceAccount/cilium-operator
? The diff succeeded, do you want to proceed? (y/N) y
✓ cilium: Applied 16 objects.
✓ Running server-side apply for all objects

New objects:
  ClusterRole/cilium
  ClusterRole/cilium-operator
  ClusterRoleBinding/cilium
  ClusterRoleBinding/cilium-operator
  kube-system/ConfigMap/cilium-config
  kube-system/DaemonSet/cilium
  kube-system/DaemonSet/cilium-node-init
  kube-system/Deployment/cilium-operator
  kube-system/Role/cilium-config-agent
  kube-system/RoleBinding/cilium-config-agent
  kube-system/Secret/cilium-ca
  kube-system/Secret/hubble-ca-secret
  kube-system/Secret/hubble-server-certs
  kube-system/Service/hubble-peer
  kube-system/ServiceAccount/cilium
  kube-system/ServiceAccount/cilium-operator
This should be pretty fast as it does not wait for readiness of Cilium. After a few seconds or minutes, you should see:
$ kubectl get pod -A
NAMESPACE            NAME                                                    READY   STATUS    RESTARTS   AGE
kube-system          cilium-g46vp                                            1/1     Running   0          2m11s
kube-system          cilium-n5ccg                                            1/1     Running   0          2m11s
kube-system          cilium-node-init-6gdcz                                  1/1     Running   0          2m11s
kube-system          cilium-node-init-8p6jj                                  1/1     Running   0          2m11s
kube-system          cilium-node-init-vswr8                                  1/1     Running   0          2m11s
kube-system          cilium-operator-74fc7f9d76-hc7fl                        1/1     Running   0          2m11s
kube-system          cilium-operator-74fc7f9d76-sdw9x                        1/1     Running   0          2m11s
kube-system          cilium-sqs26                                            1/1     Running   0          2m11s
kube-system          coredns-565d847f94-hcf4m                                1/1     Running   0          134m
kube-system          coredns-565d847f94-md625                                1/1     Running   0          134m
kube-system          etcd-kluctl-tutorial-control-plane                      1/1     Running   0          134m
kube-system          kube-apiserver-kluctl-tutorial-control-plane            1/1     Running   0          134m
kube-system          kube-controller-manager-kluctl-tutorial-control-plane   1/1     Running   0          134m
kube-system          kube-scheduler-kluctl-tutorial-control-plane            1/1     Running   0          134m
local-path-storage   local-path-provisioner-684f458cdd-zl8xj                 1/1     Running   0          134m
This shows us that the CNI has initialised properly and all PODs are running now.
A few words about deployment order
I assume it’s clear that whatever we’re going to add to the deployment project from now on, must be deployed AFTER Cilium got deployed. The reasons for this are simple: Nearly nothing can run without a CNI.
Deployment order is something that can be easily controlled in Kluctl deployment projects. By default, Kluctl deploys
all deployment items in parallel to get as much performance as possible. Consider the following example deployment.yaml:
deployments:
  - path: a
  - path: b
  - path: c
This example will cause a, b and c to be deployed in parallel. If you want b and c to be deployed after a
has been deployed, simply put a barrier
between a and b:
deployments:
  - path: a
  - barrier: true
  - path: b
  - path: c
This will cause Kluctl to stop and wait at the barrier and only continue when everything before (in this case just a)
got deployed. The same works with include and any other deployment item. We’ll leverage the barriers in the next
section.
Adding the cert-manager Helm Chart
Adding the cert-manager Helm Chart is basically the same as we’ve
seen with the Cilium Helm Chart. Open the ./base/deployment.yaml file and add a new deployment item:
deployments:
  - path: cilium
  - barrier: true
  - path: cert-manager
The barrier is important here, as noted in the previous section. It will ensure that all Cilium components are deployed before Kluctl continues with cert-manager.
Now, add ./base/cert-manager/helm-chart.yaml with the following content:
helmChart:
  repo: https://charts.jetstack.io
  chartName: cert-manager
  chartVersion: v1.11.0
  releaseName: cert-manager
  namespace: "kube-system"
  skipPrePull: true
cert-manager is a little special when it comes to installing the CRDs. It skips doing this by default and thus
requires the following ./base/cert-manager/helm-values.yaml:
installCRDs: true
Deploy it again
Now perform another deployment. You’ll notice that it will first show you what will change and then ask for
confirmation again. Press y when asked for confirmation:
$ kluctl deploy
✓ Loading kluctl project
✓ Initializing k8s client
✓ Rendering templates
✓ Pulling Helm Chart cilium with version 1.13.0
✓ Rendering Helm Charts
✓ Building kustomize objects
✓ Postprocessing objects
⚠ No discriminator configured. Orphan object detection will not work
⚠ No discriminator configured for target, retrieval of remote objects will be slow.
✓ Getting 67 additional remote objects
✓ Getting namespaces
✓ cilium: Applied 18 objects.
✓ Finished waiting
✓ cert-manager: Applied 49 objects. Applied 4 hooks.
✓ Running server-side apply for all objects

Warnings:
  no discriminator configured. Orphan object detection will not work

New objects:
  ClusterRole/cert-manager-cainjector
  ...snip...
  kube-system/ServiceAccount/cert-manager-webhook

Applied hooks:
  kube-system/ServiceAccount/cert-manager-startupapicheck
  kube-system/Role/cert-manager-startupapicheck:create-cert
  kube-system/RoleBinding/cert-manager-startupapicheck:create-cert
  kube-system/Job/cert-manager-startupapicheck
? The diff succeeded, do you want to proceed? (y/N) y
✓ cilium: Applied 18 objects.
✓ Finished waiting
✓ cert-manager: Applied 49 objects. Applied 4 hooks. Deleted 4 hooks.
✓ Running server-side apply for all objects

New objects:
  ClusterRole/cert-manager-cainjector
  ...snip...
  kube-system/ServiceAccount/cert-manager-webhook

Applied hooks:
  kube-system/ServiceAccount/cert-manager-startupapicheck
  kube-system/Role/cert-manager-startupapicheck:create-cert
  kube-system/RoleBinding/cert-manager-startupapicheck:create-cert
  kube-system/Job/cert-manager-startupapicheck
After a few seconds or minutes you should see cert-manager up and running in your cluster. We won’t further use cert-manager as it would be out of scope for this tutorial. I assume you can imagine how you would proceed with deployments that need to create cert-manager issuers and certificates (you’d use barriers and an appropriate project structure).
Add the ingress-nginx Helm Chart
Now let’s add the ingress-nginx Helm Chart. It’s important that you have used the kind configuration specified here, as otherwise the ingress controller won’t be accessible from your machine.
First, update ./base/deployment.yaml to include two new deployment items:
deployments:
  - path: namespaces
  - barrier: true
  - path: cilium
  - barrier: true
  - path: cert-manager
  - path: ingress-nginx
    waitReadiness: true
The first new deployment item is namespaces, which should contain a single file named ingress-nginx.yaml with the
following content:
apiVersion: v1
kind: Namespace
metadata:
  name: ingress-nginx
This deployment item and the barrier entry ensure that the required ingress-nginx namespace is created before we try
to deploy the ingress-nginx Helm Chart. This is a pattern that you’ll encounter in nearly all Kluctl based
deployments. It is also one of the best and easiest examples why ordering is important: You can’t deploy namespaced
objects before the target namespace is deployed.
Next, create the file ./base/ingress-nginx/helm-chart.yaml with the following content:
helmChart:
  repo: https://kubernetes.github.io/ingress-nginx
  chartName: ingress-nginx
  # Please don't try to manually upgrade this to the latest version yet. We will use this to demonstrate an upgrade later!
  chartVersion: 4.5.0
  skipPrePull: true
  releaseName: ingress-nginx
  namespace: ingress-nginx
For ./base/ingress-nginx/helm-values.yaml, you must use:
controller:
  hostNetwork: true
  service:
    type: ClusterIP
  nodeSelector:
    ingress-ready: "true"
  tolerations:
    - key: "node-role.kubernetes.io/control-plane"
      effect: "NoSchedule"
  updateStrategy:
    rollingUpdate:
      maxUnavailable: 1
    type: RollingUpdate
This configuration ensures that the ingress controller runs on the control-plane nodes and uses the host network of
these. The extraPortMappings of the kind configuration will then allow you to access
the ingress controller via localhost, or via http://my-ingress.127.0.0.1.nip.io:8080 (see https://nip.io).
The waitReadiness: true in the deployment.yaml means that Kluctl should not just deploy the resources of the
deployment item, but also wait for readiness of
each resource.
Deploy it again
Simply run kluctl deploy again and confirm it with y. You should see how Kluctl deploys all resources, runs
hooks and waits for readiness.
Add the podinfo application
We now have a somewhat functional cluster up and running locally. We can now also deploy the podinfo Helm Chart and expose it via ingress-nginx.
Let’s however first extend the project structure a bit. Edit the root deployment at ./deployment.yaml and change it to:
deployments:
  - include: base
  - barrier: true
  - include: apps
This will ensure that everything from base is deployed before it starts to deploy anything from apps. The apps
sub-deployment can now be used to deploy all kinds of apps, for example the podinfo
“microservice”.
Now create the file ./apps/deployment.yaml with the following content:
deployments:
  - path: podinfo
And ./apps/podinfo/helm-chart.yaml with the following content:
helmChart:
  repo: oci://ghcr.io/stefanprodan/charts/podinfo
  chartVersion: 6.3.4
  releaseName: podinfo
  namespace: "podinfo"
  skipPrePull: true
This time, we will create the necessary namespace in the same deployment item as the Helm Chart itself. This can be
accomplished by adding a ./apps/podinfo/kustomization.yaml with the following content:
resources:
  - namespace.yaml
  - helm-rendered.yaml
  - ingress.yaml
Kluctl will respect the order of resources found in Kustomize deployments, and thus deploy the namespace before anything else.
The helm-rendered.yaml is an auto-generated file containing the templated Helm Chart, this file however will never physically
appear in your project.
To add an ingress, add ./apps/podinfo/ingress.yaml (which is also specified in the kustomization.yaml) with the
following content:
apiVersion: networking.k8s.io/v1
kind: Ingress
metadata:
  name: podinfo
  namespace: podinfo
spec:
  ingressClassName: nginx
  rules:
    - host: podinfo.127.0.0.1.nip.io
      http:
        paths:
          - path: /
            pathType: Prefix
            backend:
              service:
                name: podinfo
                port:
                  number: 9898
The above ingress uses the previously deployed ingress-nginx controller with the class name nginx. We use
nip.io to get a simple dummy domain name for the ingress. This domain will resolve to 127.0.0.1 and
thus let you access the ingress through the extraPortMappings of the kind cluster.
Deploy podinfo
Now run kluctl deploy again and wait for it to finish. Also wait for all PODs to become ready in the cluster and then
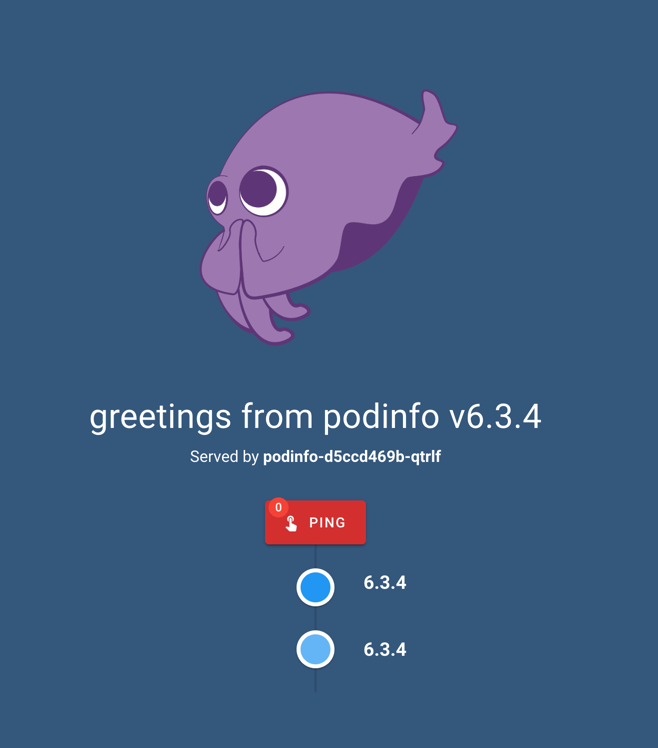
try to access podinfo by opening http://podinfo.127.0.0.1.nip.io:8080/ in your browser.
You should be greeted by this sweet little fellow :)
Tabula Rasa
Now let’s prove that the order of deployments was actually honored. Right now, you have added new stuff incrementally, so in theory the deployment could be in a state where it just worked by accident. We however want to make sure and prove that the whole deployment can be performed in one go.
Let’s delete the kind cluster, re-create it and then re-deploy:
$ kind delete cluster --name kluctl-tutorial
$ kind create cluster --name kluctl-tutorial --config kind-config.yaml
$ kluctl deploy
Things should be up and running again after a few minutes, without the need to retry the deployment.
Upgrade the ingress-nginx Helm Chart
If you look at ./base/ingress-nginx/helm-chart.yaml again, you’ll see that version 4.5.0 was used. This version is
already outdated and should be upgraded. Simply change the version to 4.5.2 and then run kluctl deploy again.
When you do this, Kluctl will first perform a dry-run and then print a diff that shows you what would happen if you confirm the deployment. The changes seen in the diff should look like this:
$ kluctl deploy
✓ Loading kluctl project
...snip...
✓ Running server-side apply for all objects

Warnings:
  no discriminator configured. Orphan object detection will not work

Changed objects:
  ClusterRole/ingress-nginx
  ...snip...
  ingress-nginx/ServiceAccount/ingress-nginx

Diff for object ClusterRole/ingress-nginx
+----------------------------------------------+----------------------+
| Path                                         | Diff                 |
+----------------------------------------------+----------------------+
| metadata.labels["app.kubernetes.io/version"] | -1.6.3               |
|                                              | +1.6.4               |
+----------------------------------------------+----------------------+
| metadata.labels["helm.sh/chart"]             | -ingress-nginx-4.5.0 |
|                                              | +ingress-nginx-4.5.2 |
+----------------------------------------------+----------------------+

Diff for object ClusterRoleBinding/ingress-nginx
+----------------------------------------------+----------------------+
| Path                                         | Diff                 |
+----------------------------------------------+----------------------+
| metadata.labels["app.kubernetes.io/version"] | -1.6.3               |
|                                              | +1.6.4               |
+----------------------------------------------+----------------------+
| metadata.labels["helm.sh/chart"]             | -ingress-nginx-4.5.0 |
|                                              | +ingress-nginx-4.5.2 |
+----------------------------------------------+----------------------+
...snip...

? The diff succeeded, do you want to proceed? (y/N)
If you confirm the deployment, it will apply the changes seen before.
Templating and Kluctl Targets
What you have seen so far is just showcasing how Kluctl deployment projects are structured and how Helm is integrated. This alone is already very powerful, as it allows you to structure large and complex deployments in a way that mirrors your intent, without too much complexity or boilerplate.
The next step would be to introduce templating and Kluctl targets. This will then allow you to make your deployment multi-environment and multi-cluster capable.
These topics will however require another post, as it would be too much to be covered in this post as well.
GitOps with Kluctl
This post has shown the “push” flow of Kluctl by simply calling Kluctl from your local machine. The same flow can be adapted to a pipeline based CI/CD system, e.g. Github Actions or Gitlab CI.
Kluctl also offers a pull based flow, implemented through the Kluctl controller. This is comparable to how Flux
does it, you deploy a KluctlDeployment custom resource and the controller handles reconciliation via periodic
deployments.
Kluctl vs Flux/ArgoCD/Helmfile
As mentioned at the top of this post, there are multiple solutions available that can all be used to tackle the same set of problems. All of these do it with different approaches and I will try to compare these approaches with the way Kluctl does it.
Flux
Flux allows to define Kustomizations and HelmReleases, which are both Kubernetes Custom Resources. These Custom Resources are then handled by different Flux Controllers which perform the actual reconciliation.
This in turn means that you make yourself dependent on the Custom Resources being applied on the cluster and the controller processing them. This also means, you can’t easily try out things locally, as the only available command to do this is flux diff kustomization which is much harder to use then kluctl diff and unable to handle Helm Charts.
You will also never be able to mix GitOps with non-GitOps flows, e.g. “deploy from your laptop” for development environments and GitOps for “real” environments. Being able to mix these flows would allow you to move extremely fast while testing out and researching new stuff, without the need to constantly push to Git and then wait for the reconciliation to succeed/fail.
Dependency management in Flux is handled via dependsOn fields, which can however not be mixed with different resource types.
ArgoCD
I’m not very experienced with ArgoCD, so take my words with a grain of salt. But from everything I’ve seen so far, the same things I wrote about Flux also apply to ArgoCD. The biggest difference is that you have a UI that visualises changes and drift.
Dependency management is handled via Sync Waves, which allows you to give resources a priority which is then used to determine deployment order.
Helmfile
Helmfile is probably the tool that can be best compared to Kluctl. There are however some important differences. Helmfile concentrates on Helm as being the underlying building block for all deployments. This means, it will internally convert plain manifests and Kustomize deployments into Helm Charts and install them via the Helm CLI.
Kluctl on the other hand uses Kustomize as the base building block and instead converts Helm Charts into Kustomize
deployments by simply rendering the Charts. This also means, that Kluctl will not use helm install but instead rely
on its own server-side-apply based implementation, giving it much better conflict detection, conflict resolution and
diffing capabilities.
Helmfile currently has no GitOps style controller available. From what I can find online, people tend to use
helmfile template to simply generate plain manifests which they then commit and push to Git.
What next?
The project that we created in this post is only partially useful, as it is not ready for multi-environment and multi-cluster deployments. In an upcoming post, I will describe how to add targets and use templating to allow different flavors to be deployed. I will also describe how to properly split up projects, for example so that you have a cluster-base deployment with Cilium and ingress-nginx and multiple application specific deployments.